The quick answer
In the kitting add-on, choose the batching work center and the work order, click New to create a container for the first batch, then open it and click Fill. For each ingredient you add by hand, choose the item, enter its lot and the weighed quantity against the Target, and click Add. When the container shows every ingredient, click Deliver. The add-on moves the container to production. NetSuite records stock moving only when a native transaction posts.
This guide covers a third-party shop-floor kitting add-on for NetSuite Manufacturing. Its screens, buttons and wording belong to the add-on, not to standard NetSuite, so your account only has them if the add-on is installed and set up. The example is work order WO2417 for 3 batches of the assembly LIQCLN250GL, and the screenshots use sample data and a fictional operator and company.
Before you start
The work order has to exist in NetSuite before the add-on can list it, so check it first: the assembly, quantity, location, bill of materials revision, routing and operation, component quantities and status. Every ingredient in the example is lot-controlled and each lot has stock at the work order's location.
The add-on's work center, batch count, container, status and Deliver wording are its own. Do not read them as NetSuite statuses. A container record or a label on its own creates no inventory and consumes no component, and it reserves no lot unless the add-on's integration creates a reservation or commitment. Whether the add-on posts anything to NetSuite when you fill or deliver a container depends on its integration, so ask whoever set it up. Also check that each lot has enough available stock at the right location, bin, inventory status and expiration, and that the add-on and NetSuite use the same units. Roles need the add-on's permissions plus NetSuite access to work orders and inventory detail, and to the issue, completion or build transactions the add-on relies on. Partial batches, permanent containers, serial-controlled ingredients and several work centers add steps or change what is listed.
01. Choose the work center and the work order
At the kitting station the add-on opens on Batching For. Under Select Work Center, click the batching work center, Mixer 1. The Select Work Order Being Kitted table lists WO2417 with its Assembly LIQCLN250GL, Op Name Mixing, Full Batches 3 and Partial Batches 0. Click the row.
The header now shows the work order, the assembly, Batch For Mixing and Containers 0 of 3. In this example one container holds one batch, so the work order needs three containers. The container count is not the work order quantity.
02. Create a container for the first batch
Select Container is empty at first: Empty Containers, In Use Containers and Container Details have nothing in them. Click New.
On Create Container, the label is already filled in as WO2417-1 and the type is Bag. Permanent and Return When Empty stay unchecked, so this is a disposable container. A permanent container can be tracked and returned to a work center when it is empty, and you choose that work center under Return to Work Center. Click Continue.
03. Open the container and start Fill
WO2417-1, Bag now appears under Empty Containers, and the header shows Containers 1 of 3. Click the container. Container Details shows its label and type, and it is red because nothing is in it yet. Click Fill.
04. Add each ingredient with its lot and quantity
Fill lists the ingredients the add-on takes from the work order and its bill of materials under Item to Add, with Lot and Serial flags. Click Citrus Extract. Its Target for one batch, 5.82 Gal., appears.
Enter the lot, CIT0914, in Lot or Serial. With a barcode scanner you scan it. Enter the weighed quantity, 5.85, in Quantity, or take it from a connected scale, and click Add. The container turns green and lists Citrus Extract, CIT0914 and 5.85 under Contents. How far a weighed quantity can differ from the target is an add-on setting.
Repeat the same sequence for Lemon Fragrance (lot FRG0914, 9.43 against a target of 9.40 lb) and Surfactant Blend (lot SUR0914, 14.78 against a target of 14.75 lb). Leave the bulk ingredient, Sodium Carbonate Solution, alone: the bulk system supplies it, so it never goes into the container. It still has to be accounted for in your process, whether through the bulk integration, a separate native issue or a later backflush.
05. Check the finished container
After the third ingredient the add-on returns to Select Container. WO2417-1 is now under In Use Containers, Container Details is green, and Contents lists the three ingredients with their lots and quantities. The header still reads 1 of 3, because the other two containers are not built yet.
Compare the lots and quantities with what you weighed before you deliver. The colors and the In Use list are the add-on's cues. They do not mean the lots are committed, picked, issued or in work in process.
06. Deliver the container to production
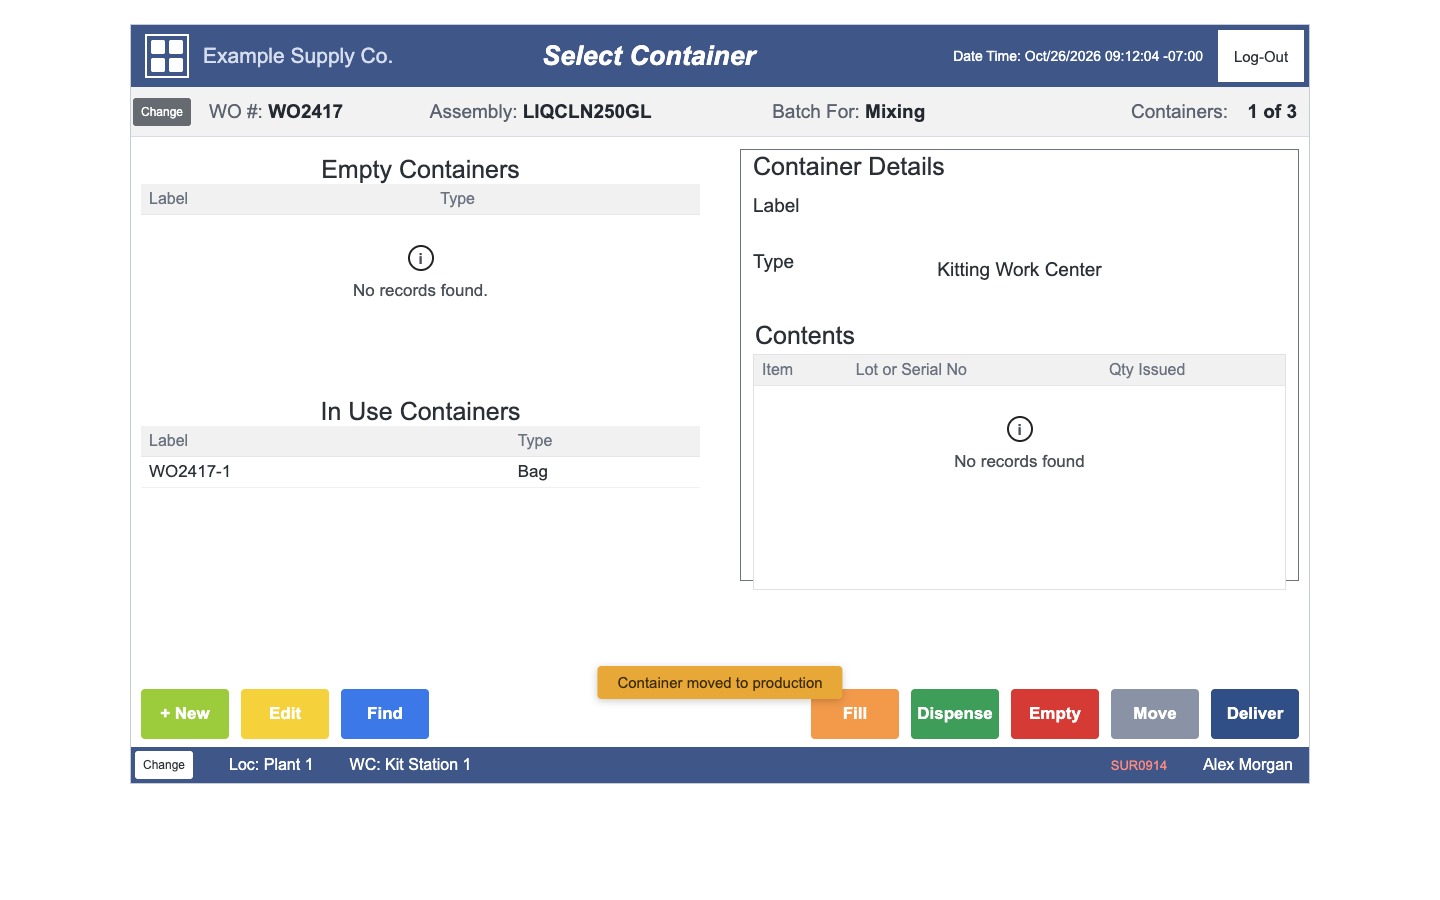
With WO2417-1 selected, click Deliver. The add-on shows Container moved to production and clears Container Details. The add-on now treats the kit as staged for the Mixing operation.
That message is the add-on's status. Confirm whether the add-on also created a native transaction. If it did not, on-hand and work in process in NetSuite have not changed. Available quantity can still change if the add-on reserves or commits stock through its integration. On-hand and work in process change when a native posting transaction runs: a Work Order Issue on a WIP work order, a Work Order Completion that backflushes the components, or an Assembly Build on a work order that is not WIP. An inventory transfer only moves stock between locations or statuses and does not consume components against the work order.
Before you rely on Deliver, ask whoever configured the add-on which native transaction it creates, whether it posts at once, on a schedule or on request, what happens when the posting fails, and whether delivering a container twice is safe. Then check that the lots and quantities issued match the container, that the quantities issued or backflushed and the remaining requirements on the work order updated, and that no ingredient is consumed twice, for example by a manual issue followed by a backflushing completion. Repeat the sequence for the other two containers.
Common questions
Is kitting a native NetSuite feature?
No. The containers, the Fill screen and Deliver in this guide belong to a third-party shop-floor kitting add-on. It reads native work orders, bills of materials and lot-numbered inventory, and the add-on's records are its own staging and traceability layer.
Does Deliver issue the components to the work order?
Not necessarily. Container moved to production is the add-on's status. It issues components only if the add-on's integration creates or triggers a native posting transaction, such as a Work Order Issue, a completion that backflushes or an Assembly Build on a work order that is not WIP. An inventory transfer moves stock but does not consume components against the work order. Ask whoever configured the add-on which transaction it creates, if any.
Does the add-on need a kitting step in the routing?
Not necessarily. The add-on in this example is designed to work beside a work order without a dedicated kitting operation, but that is a capability of the add-on, not of NetSuite. Its mapping to a work center or operation is its own, and staging a container does not complete the NetSuite operation.
Why is one ingredient left out of the container?
In the example a bulk ingredient is handled by a separate bulk-material process, so it stays in the Item to Add list and is never added by hand. Leave an ingredient out only when that process records the quantity and prevents it from being consumed twice, because the kit is complete only when every ingredient is accounted for.
Does the container count equal the work order quantity?
No. The count follows the add-on's batching rules. In the example one container holds one batch, so a work order for 3 batches needs 3 containers, which is not the work order quantity or the completed quantity.