The quick answer
Fivetran signs in to NetSuite with five values from NetSuite plus the SuiteAnalytics Connect details. Copy the Service Host, Service Port and Account ID from the SuiteAnalytics Connect driver page. Turn on Token-Based Authentication, create an integration record with only that option checked, and copy its Consumer Key and Consumer Secret. Create an access token for the integration record, a user and a role, and copy the Token ID and Token Secret. Read the role's Internal ID in Manage Roles. In Fivetran, add the NetSuite SuiteAnalytics connector, enter those values, choose NetSuite2.com as the data source and click Save & Test. In Select Data to Sync, clear the parent checkbox, check only the tables you want, and start the initial sync.
The screenshots show sample data. Person, company, account, host and credential values are fictional. Use your own records and values when following the steps.
Before you start
You need a NetSuite administrator to do the NetSuite side, and a Fivetran account with a destination already set up. The recording starts at the NetSuite Home dashboard and does not show the Fivetran destination setup.
SuiteAnalytics Connect has to be provisioned for your account. It is a licensed service, and some releases also show a SuiteAnalytics Connect feature under Enable Features, so check that it is on where it appears. If Set Up SuiteAnalytics Connect is not available in the Settings portlet, stop and ask your NetSuite account contact to enable the service. The role on the access token also needs the SuiteAnalytics Connect permission and has to be able to use the NetSuite2.com data source. In the recording, the SuiteAnalytics Connect driver page shows an Information banner saying NetSuite2.com is not accessible for this role. That banner is about the role you are signed in with. You can still copy the host, port and account ID. What matters is whether the role on the access token can use NetSuite2.com, and Fivetran's connection test is where that shows up.
Role and user restrictions can also block the connection even when the permissions look right. Check the role for IP restrictions, and check that the user is active, has Give Access checked and is not blocked by a sign-in policy such as mandatory two-factor authentication. The administrator who creates the token must be able to open Setup > Users/Roles > Access Tokens > New and save a token. Permission names and availability for that can vary by account.
Use a dedicated integration user, not a personal login, and do not connect through Administrator. A token belongs to one user acting in one role. The role you choose on the access token and the Role ID you enter in Fivetran must be the same role. The recording gives its user two roles, a standard one and a new custom one, but creates the token with the standard Data Warehouse Integrator role. The custom role plays no part in the token. To connect through a custom role instead, choose that role on the token and enter its ID in Fivetran, and give the user only the roles it needs.
The role also affects what NetSuite2.com exposes. A successful connection does not mean every table, field, subsidiary or transaction type is readable. Data Warehouse Integrator is broad but not unlimited: restricted data such as credit-card information stays restricted, and global permissions can still limit it. A table can also be listed in Fivetran's schema and still return restricted or partial data. If a table you expect is missing or comes back empty, check the role's permissions and your account's features first.
The Fivetran screens here are the ones shown in this walkthrough. Fivetran's own screens, labels and defaults can differ from them, so follow the vendor's current setup guide for anything on the Fivetran side.
01. Find the SuiteAnalytics Connect values
On the NetSuite Home dashboard, click Set Up SuiteAnalytics Connect in the Settings portlet. That opens SuiteAnalytics Connect Driver Download.
Under Your Configuration, copy the Service Host, Service Port and Account ID. Service Datasource reads NetSuite2.com. Keep these for the Fivetran form. The host, port and account ID must belong to the same NetSuite environment. A sandbox account ID includes its suffix, so copy the value exactly as shown.
The table also has a Role ID row, 3 in this recording. Do not copy it into Fivetran unless that is the role you put on the access token. Step 6 shows where to read the role ID for the connector.
02. Enable Token-Based Authentication
Go to Setup > Company > Enable Features and open the SuiteCloud subtab. Under Manage Authentication, check Token-based Authentication. NetSuite shows the SuiteCloud terms, and you click I Agree. Then click Save.
The recording also checks Client SuiteScript and Server SuiteScript under SuiteScript first, clicking I Agree on the terms for each. Those two matter when the same tokens are also used with RESTlets or other script-based integrations. SuiteAnalytics Connect itself needs the token feature, so the two script features are not what this connection depends on. Enable them only if your account also uses the tokens with scripts. OAuth 2.0 is a different mechanism that this connector setup does not use. In this account it is also checked, and nothing in the walkthrough changes it.
03. Create the integration record
Go to Setup > Integration > Manage Integrations > New. Type the integration name, here Warehouse Replication Integration, and make sure State is Enabled. On the Authentication tab, check Token-based Authentication and make sure the other options are cleared. In current releases Authorization Code Grant under OAuth 2.0 can be checked on a new record, so clear it. Click Save. Integration record options and labels can differ by account and release.
On the saved record, under Client Credentials, copy the Consumer Key / Client ID and the Consumer Secret / Client Secret. NetSuite shows them only on this page. If you leave it without copying them, you have to reset the integration's credentials to get new values, and then update Fivetran. Keep them in a password manager or paste them straight into Fivetran's secret fields, not in a document or a message.
04. Create a role and give the user access
Go to Setup > Users/Roles > Manage Roles > New and type a name, here Warehouse Replication Role. On Permissions, click the Setup subtab. Choose Log in using Access Tokens in the Permission list, set Level to Full and click Add. Choose SuiteAnalytics Connect, set Level to Full and click Add. Click Save. Log in using Access Tokens is not the same permission as Log in using OAuth 2.0 Access Tokens. A role used for real replication also needs the ordinary Lists, Transactions and Reports permissions for the data you want to read. In this walkthrough the new role is not the one the token uses, so its permissions do not affect the Fivetran connection.
Next, decide which user owns the connection. Go to Setup > Users/Roles > Manage Users, point at the user's name, and click Edit in the card that opens. Here the user is Warehouse Sync User.
On the employee record, open the Access subtab and make sure Give Access is checked. Under Roles, choose Data Warehouse Integrator and click Add, then choose the new role and click Add. Click Save. The role you use on the token in the next step must be a role this user holds, so assign it before you create the token. If you plan to connect only through Data Warehouse Integrator, the second role is not needed.
05. Create the access token
Go to Setup > Users/Roles > Access Tokens > New. Choose the integration record in Application Name, the integration user in User and Data Warehouse Integrator in Role. NetSuite fills Token Name from those choices. Click Save.
The saved page shows the Token ID and Token Secret once. Copy both now. If you lose them, create a replacement token and update Fivetran.
06. Find the role ID
Go to Setup > Users/Roles > Manage Roles, find Data Warehouse Integrator and read its Internal ID. It is 57 in this example account. Fivetran expects this internal ID, not the role name, and not the Role ID row from the driver page unless that is the token's role. Do not reuse the example number. Read the value in your own account, because it can differ between accounts and between a sandbox and production. If the list has no Internal ID column, set Style to Grid or open the role and read the id value in the browser address bar.
07. Add the connector in Fivetran
In the Fivetran dashboard, click Add connector, type NetSuite in the search box, click NetSuite SuiteAnalytics and click Continue Setup. The form opens with a Destination schema of netsuite_suiteanalytics. Keep it or enter your own. The form warns that the schema name is permanent.
Enter the Service Host, Service Port and Account ID from step 1. For Data Source, select NetSuite2.com. Fivetran labels it BETA in this walkthrough and offers NetSuite.com above it with a note that support for that legacy source has stopped.
Enter the Consumer Key and Consumer Secret from step 3, the Token ID and Token Secret from step 5 and the Role ID from step 6. The four secret fields are masked as you type. Click Save & Test.
When the tests pass, Fivetran shows All connection tests passed. Click Continue. A failed test here usually points to one of the values, a token that does not match its user and role, or a role that cannot use SuiteAnalytics Connect or NetSuite2.com.
08. Choose the tables and start the sync
Wait while Fivetran fetches the source schema. In Select Data to Sync, the netsuite schema starts with all 1,435 tables checked. In this demonstration account that is the schema this role can see in NetSuite2.com. The count depends on the account, its features and the role, so yours will differ. Clear the 1,435 tables checkbox, then check only the tables you want. Here that is Account and accountingBook. Click Save & Continue.
In How would you like to handle changes?, keep Allow all and click Continue. This setting decides what happens when NetSuite later adds schemas, tables or columns. These are Fivetran's schema-change policies, not NetSuite permissions. Allow columns blocks new schemas and configurable tables but allows new columns. Block all blocks all three. Exact wording and defaults can change by connector version.
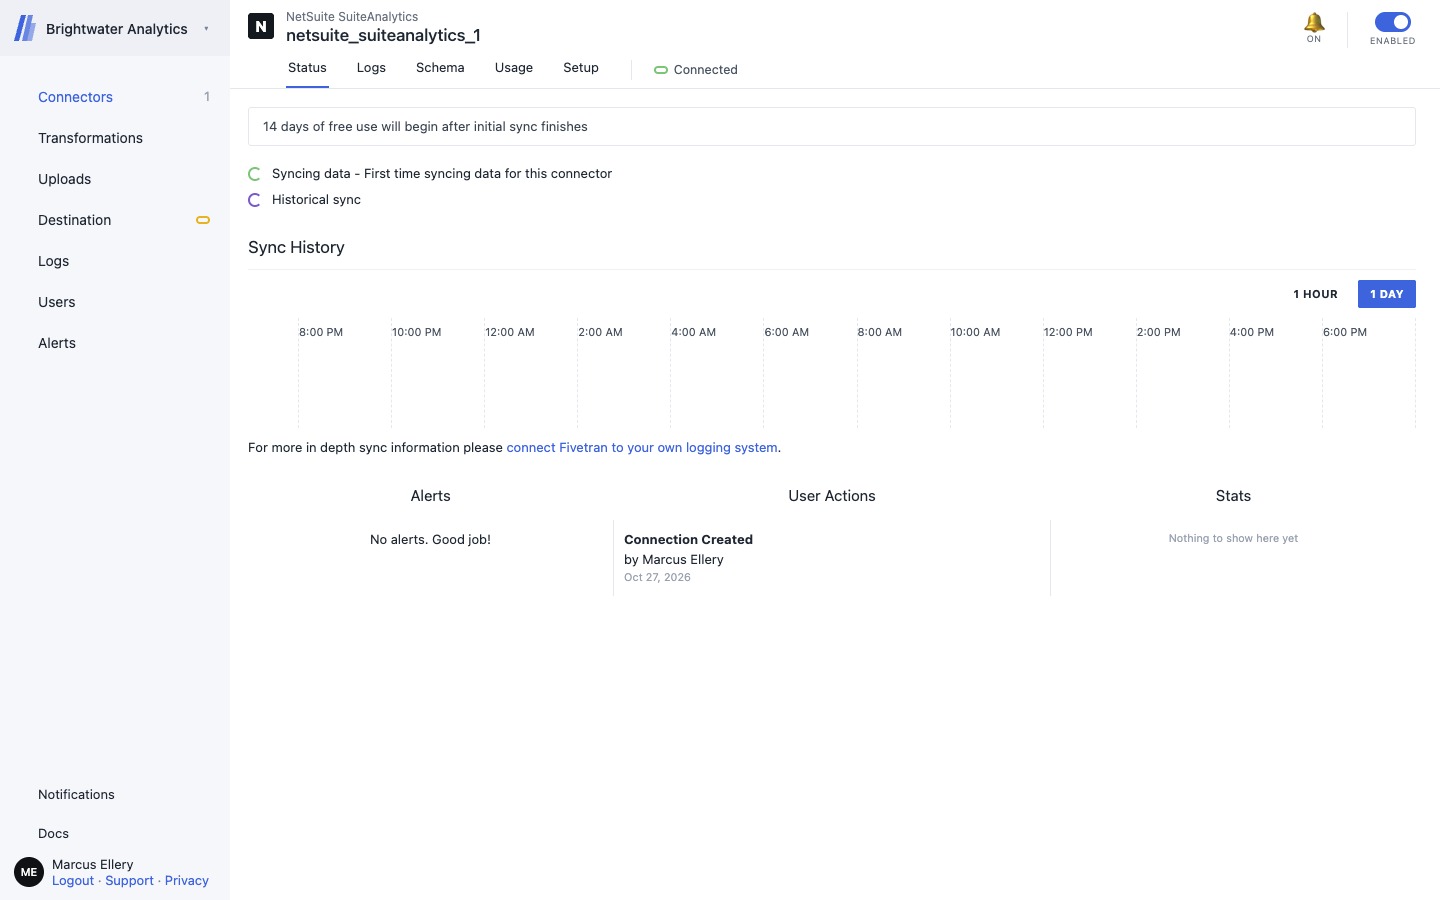
Click Start Initial Sync. The connector page then shows Syncing data and Historical sync, which means the first sync of the selected tables has begun. The first sync can take a long time on a large data set.
Check the result
- You copied the consumer key and secret from the integration record and the token ID and secret from the saved token before leaving those pages. NetSuite shows each pair once.
- Fivetran showed All connection tests passed after Save & Test.
- Select Data to Sync has only the tables you chose checked. Here that is 2 of the 1,435 listed.
- The connector page shows Syncing data and Historical sync.
Passing the connection test proves that authentication and connectivity work. It does not prove that the selected tables return complete data, that every column is readable, or that the first sync will finish quickly. After the first sync, compare a row count or a known record in the destination with NetSuite. For a large data set, start with a few tables like this walkthrough does, and add more once those look right.
Common questions
What do I need from NetSuite to set up the Fivetran NetSuite SuiteAnalytics connector?
Eight values. The Service Host, Service Port and Account ID come from the SuiteAnalytics Connect driver page and must belong to the same environment. The Consumer Key and Consumer Secret come from the integration record, the Token ID and Token Secret come from the access token, and the Role ID is the internal ID of the role on that token. Token-Based Authentication enabled, an integration record, a user and a role that user holds make those values possible.
Can I see the consumer secret or token secret again?
No. NetSuite shows the Consumer Secret on the page right after you save the integration record, and the Token Secret on the page right after you save the access token. If you lose the consumer values, reset the integration record's credentials. If you lose the token values, create a replacement token. Either way, update Fivetran, because the old values can stop working. Treat both secrets like passwords.
Why does the SuiteAnalytics Connect page say NetSuite2.com is not accessible for this role?
The banner refers to the role you are signed in with, not to the role on your access token. You can still copy the host, port and account ID. The test that matters is whether the role on the access token can use NetSuite2.com. Use Data Warehouse Integrator or a role with the NetSuite2.com permissions, and check that role and user for IP restrictions and sign-in policies. Changing the role you are signed in with does not change what the token can do.
Do I need Client SuiteScript and Server SuiteScript for this connector?
The recording enables both, but SuiteAnalytics Connect with token-based authentication needs the Token-Based Authentication feature and SuiteAnalytics Connect itself. The script features matter if the same tokens are also used with RESTlets or other script-based integrations. If you do not use them that way, you do not need to enable them.
Which role do I use, and does the custom role matter?
The access token uses exactly one role, and the Role ID you enter in Fivetran has to be that same role. In this walkthrough the token uses Data Warehouse Integrator, so the custom role the user also holds plays no part in the connection. To connect through a custom role instead, give it Log in using Access Tokens and SuiteAnalytics Connect, add the data permissions it needs, choose it on the token and enter its internal ID in Fivetran. Choosing it on the token is what makes its permissions matter.