The quick answer
Go to Setup > Users/Roles > Manage Roles > New, name the role, check Web Services Only Role under Authentication, and on the Permissions tab add the transaction and list permissions the integration works with plus Log in using Access Tokens and the web services permission it calls (REST Web Services or SOAP Web Services) on the Setup subtab, then Save. The role is only for API calls and cannot sign in to the NetSuite user interface.
The screenshots show sample data. The company, person and role name are fictional. The form and wording described here were observed in one account and release, and the permission names on the Setup subtab come from a walkthrough video, so check them against your own account. The recording and these screenshots end on the completed form, before the Save click.
Before you start
This guide covers the role form only. Token-based authentication also needs the feature turned on, an integration record, an integration user who has this role on the Access subtab of their record, and an access token for that user and role. Use a separate administrative role for that setup work, because a web services only role cannot be used to sign in. This guide does not cover the application's own connection screen either.
01. Open a new role
Go to Setup > Users/Roles > Manage Roles > New. In the account reviewed, the form shows General, Subsidiary Restrictions and Authentication sections above a Permissions tab strip. User Subsidiary is selected by default.
02. Name the role and choose its access settings
Type the Name Order Sync Integration Role. Under Subsidiary Restrictions choose All and check Allow Cross-Subsidiary Record Viewing, because the application works with orders from every subsidiary. Under Authentication check Web Services Only Role. That box limits how the role can be used: it is for API calls and cannot be used to sign in to the user interface. It does not grant any permission by itself. Choose the narrowest subsidiary setting that fits your integration; All matches the walkthrough.
03. Add transaction and list permissions
On the Permissions tab, Transactions subtab, add Sales Order and Purchase Order. Each new row starts at View; click the level text and change it to Full, as the walkthrough does. Then open the Lists subtab and add Customers and Items at View. An order refers to customers or vendors and to items, so permission on the transaction alone is not enough. The role also needs access to the custom forms and custom fields on the transaction. Add Vendors for purchase orders if the integration reads them.
04. Add the Setup permissions
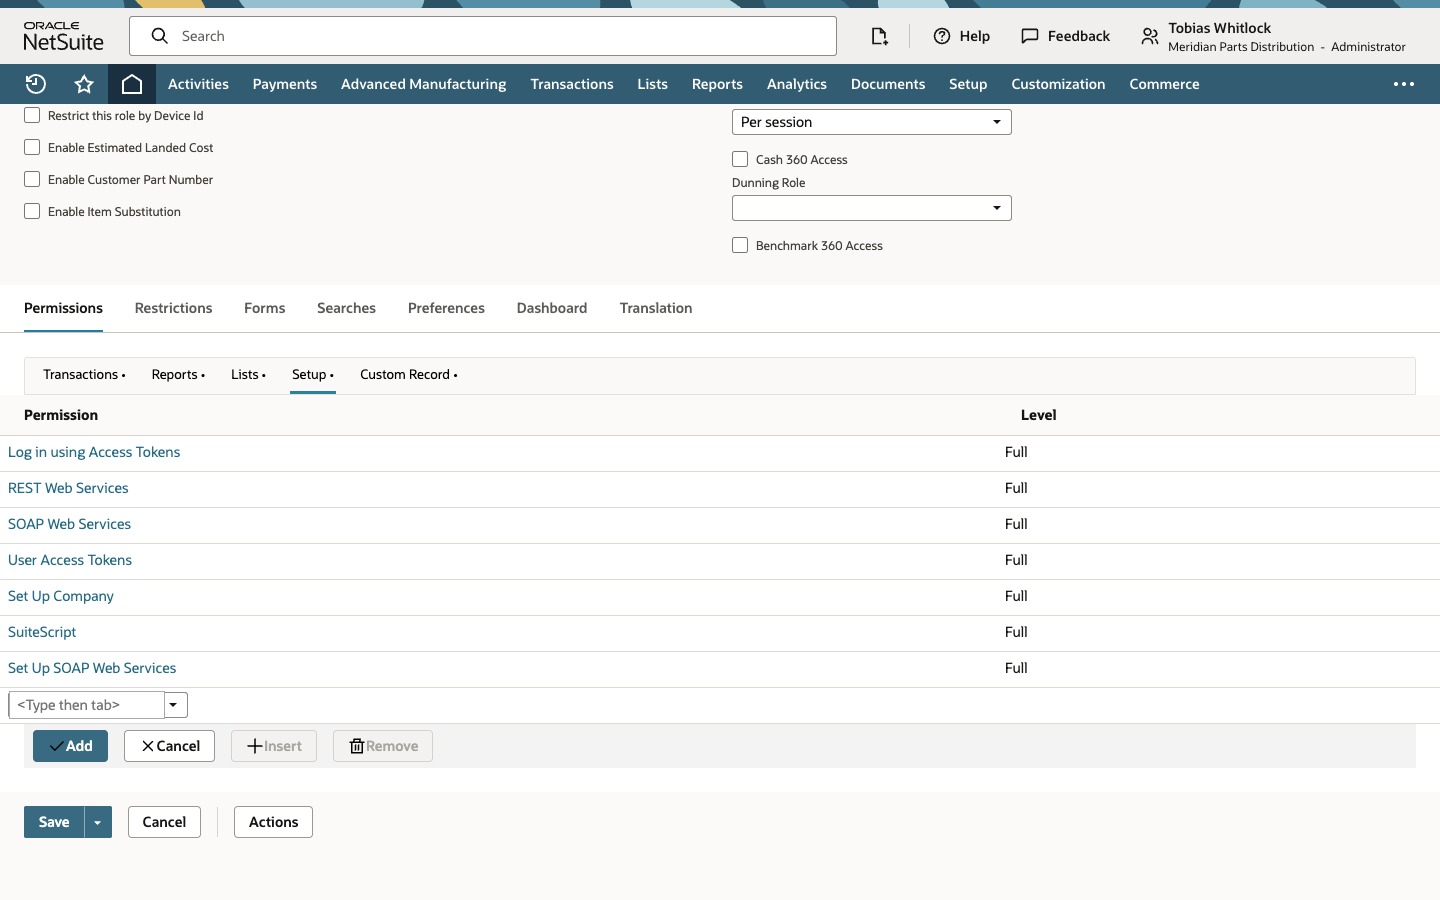
Open the Setup subtab and add Log in using Access Tokens, REST Web Services, SOAP Web Services, User Access Tokens, Set Up Company, SuiteScript and Set Up SOAP Web Services, changing each to Full. The ones that matter most for token-based sign-in are Log in using Access Tokens and the web services permission for the API the application calls. The others in the walkthrough are optional for a role that only calls the API: User Access Tokens is for managing tokens, Set Up Company and Set Up SOAP Web Services are administrative, and SuiteScript is for integrations that use scripts such as RESTlets. For OAuth 2.0, use Log in using OAuth 2.0 Access Tokens instead of the token login permission. Follow your application vendor's list.
05. Review the lists, then save
Open the Transactions, Lists and Setup subtabs in turn and check the levels, then click Save. The recording stops before the save, so the page NetSuite shows afterward is not shown here. Afterward, give the role to the integration user and create the access token.
Check the result
- The Name is Order Sync Integration Role, Accessible Subsidiaries is All and Web Services Only Role is checked.
- Sales Order and Purchase Order are at Full, and Customers and Items are at View.
- The Setup subtab lists the seven permissions at Full.
Common questions
What does the Web Services Only Role checkbox do?
It makes the role unusable for signing in to the NetSuite user interface, so it is meant for integrations. It limits how the role is used; it does not grant API permissions by itself. A user can still sign in through a different role that is not web services only.
Which permissions does a role need for token-based authentication?
Log in using Access Tokens, the web services permission for the API in use (REST Web Services or SOAP Web Services), and the record, list and custom form access the integration needs. The role also has to be assigned to the user the token is created for.
What is the difference between Log in using Access Tokens and Log in using OAuth 2.0 Access Tokens?
The first lets the role sign in with token-based authentication. The second is for OAuth 2.0, which applies to REST web services and RESTlets but not to SOAP web services.
Does an integration role need Set Up Company, SuiteScript or Set Up SOAP Web Services?
Not necessarily. They are administrative or script-related permissions, and the walkthrough grants them at Full. For least privilege, add them only if the integration really needs them, and test with the integration role rather than Administrator.
Why does the role need Customers, Items and Vendors as well as Sales Order?
An order refers to those records and NetSuite checks access to them. The role also needs access to the custom forms and custom fields on the transaction.