The quick answer
Create an integration record under Setup > Integration > Manage Integrations > New with Token-based Authentication and TBA: Issuetoken Endpoint checked, and copy the Consumer Key and Consumer Secret NetSuite shows once. Then go to Setup > Users/Roles > Access Tokens > New, choose the integration, a user and a role, Save, and copy the Token ID and Token Secret shown once.
The screenshots show sample data. The company, person, integration, user, role and all credential values are fictional. The form, defaults and wording described here were observed in one account and release, so check them against your own. NetSuite has announced that, from release 2027.1, new token-based integrations for SOAP web services, REST web services and RESTlets can no longer be created, so prefer OAuth 2.0 for new work.
Before you start
On Setup > Company > Enable Features, SuiteCloud subtab, turn on Token-Based Authentication under Manage Authentication. Create a role for the connector, give it Log in using Access Tokens plus the record and service permissions the connector needs, and assign the role to the integration user on the Access subtab of the user's record. Use a dedicated role rather than Administrator. Creating a token for another user needs the Access Token Management permission. This guide does not cover those steps or entering the values in the connector's own screen, which also needs your account ID.
01. Open a new integration
Go to Setup > Integration > Manage Integrations > New. On the Authentication subtab, Token-based Authentication is cleared and Authorization Code Grant is checked in the account reviewed.
02. Choose the token-based settings
Enter the Name Order Sync Connector. Check Token-based Authentication and TBA: Issuetoken Endpoint, leave TBA: Authorization Flow cleared unless the connector uses that flow, and clear Authorization Code Grant, which belongs to OAuth 2.0. The OAuth 2.0 fields grey out once it is cleared. User Credentials is a separate option that ordinary token-based authentication does not need, so it stays cleared here; follow the connector's own instructions if it asks for it.
03. Save and copy the consumer credentials
Click Save. NetSuite shows Integration successfully Saved. Under Client Credentials it shows the Consumer Key / Client ID and Consumer Secret / Client Secret, with a warning that this is the only time they are displayed. Copy both to the connector's setup through a secure channel.
04. Create the access token
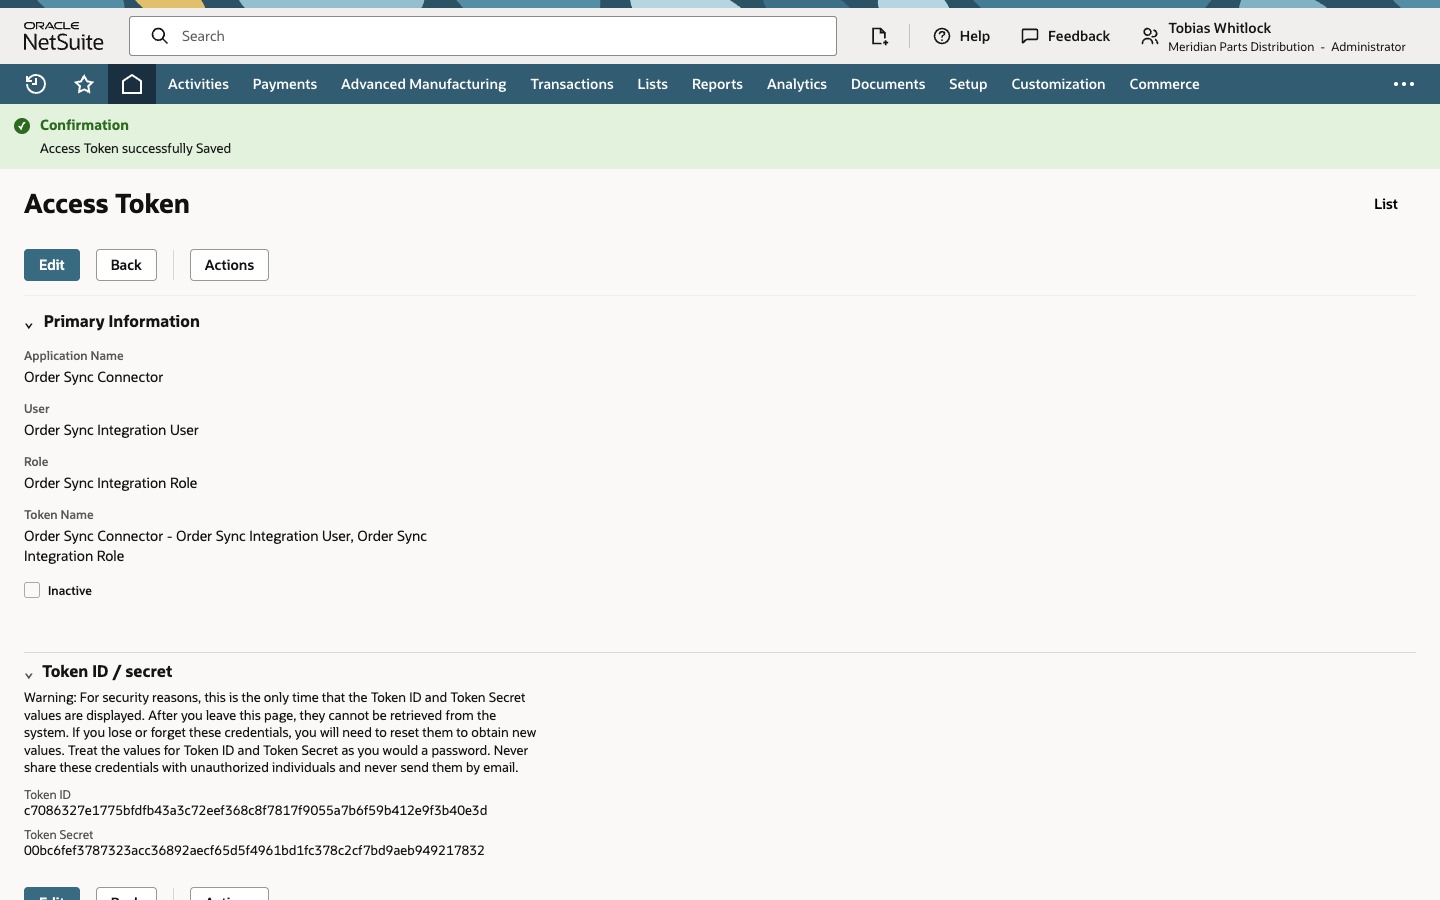
Go to Setup > Users/Roles > Access Tokens > New. Choose the Application Name Order Sync Connector, the User Order Sync Integration User and the Role Order Sync Integration Role. The user must have that role on their record. The Token Name shows the application, user and role together; type one if it is blank in your release.
05. Save and copy the token values
Click Save. NetSuite shows Access Token successfully Saved and, under Token ID / secret, the Token ID and Token Secret. They are shown only now, so copy them to the connector as well.
Check the result
- The integration record is saved with Token-based Authentication and TBA: Issuetoken Endpoint checked.
- You copied the Consumer Key and Consumer Secret from the Client Credentials band.
- The access token is saved for the right application, user and role, and you copied its Token ID and Token Secret.
Common questions
Where do I find the Consumer Key and Consumer Secret?
On the saved integration record, under Client Credentials, right after you first save it. NetSuite shows them once.
Which boxes do I check on the integration record for TBA?
Token-based Authentication and, for a connector that asks for a token through the issuetoken endpoint, TBA: Issuetoken Endpoint. Use TBA: Authorization Flow only if the connector uses that flow. Authorization Code Grant is OAuth 2.0 and is not needed for a manually created token.
Does TBA need User Credentials?
Not for ordinary token-based authentication. Some vendor instructions ask for it, so follow the connector's guide.
Where do I create the access token?
Under Setup > Users/Roles > Access Tokens > New. Choose the integration as the application name, then the user and the role.
Which permissions are involved?
The role used by the token needs Log in using Access Tokens and the record and service permissions the connector uses. Managing your own tokens needs User Access Tokens, and creating tokens for other users needs Access Token Management.