The quick answer
With the Shared Transactions SuiteApp installed, open the approved vendor bill and choose Allocate Expenses. On the Shared Transaction Worksheet, select a line and give it weighted rows by department, class, location or subsidiary, either by applying a saved template or by adding rows one at a time. Click Save. The app generates a journal that moves each destination's share, and the bill's Shared Transaction subtab lists that journal's lines and links to it. Check the Allocation Impact view for the debits and credits and the Allocations view for each row's weight and weighted amount.
Shared Transactions is a third-party SuiteApp from Netgain, not a native NetSuite feature. A native vendor bill posts to one subsidiary, so splitting its cost across subsidiaries normally means a separate allocation schedule or a manual intercompany journal that nothing links back to the bill. The worksheet below starts from the bill instead, and the journal it creates stays linked to it. The example uses fictional data: Alex Morgan at Example Supply Co. enters one 24,200.00 bill in the East subsidiary and moves part of it to West.
Before you start
The example needs the following. Treat the list as the setup behind the example, not as a universal checklist, and confirm each point in your own account.
- The SuiteApp is installed, licensed and enabled for the bill form and your role, so that the Allocate Expenses button and the Shared Transaction subtab are visible.
- OneWorld, because the example moves cost between subsidiaries, plus the intercompany receivable and payable accounts and, where your intercompany setup requires them, representing entities for East and West.
- The accounting periods for the bill and the journal are open, and your role can create and view journals.
- The bill has expense lines, is approved and has no payments applied. Item lines, tax, landed cost and amortization lines may not behave like plain expense lines, so test them separately.
Created, approved and posted are three different states for the generated journal. In this example, saving the worksheet on an approved bill creates an Advanced Intercompany Journal at once. The app's setup also has an option to use custom transactions, and some configurations create the journal later, on approval or on a schedule, or leave it pending journal approval. Confirm which applies in your account, and test in a sandbox before you use the flow on live bills.
01. Open the bill and choose Allocate Expenses
Open the vendor bill. In the example it is bill 5210 for Brightline Facilities Services, 24,200.00, in Example Supply Co. : East, with an Approval Status of Approved. Allocate Expenses sits beside the usual bill commands.
On the Expenses and Items subtab the bill has three lines: 6420 Office Supplies Expense for 8,400.00, 6650 Contract Labor for 12,500.00 and 6310 Advertising for 3,300.00. The first two will be allocated and the advertising line will be left alone. The grid also shows the app's Shared Transaction Template column and its one-to-one posting columns, which stay empty here.
Click Allocate Expenses. The Shared Transaction Worksheet opens with the transaction, vendor, subsidiary and approval status across the top, a Transaction Lines list on the left and an Allocations panel on the right. Allocations stays empty until you select a line, because each line has its own allocation.
02. Apply a template to the office supplies line
Select the 6420 Office Supplies Expense line. Open Apply Template and choose a saved template; the example uses Shared Overhead Split. The Allocations panel fills with four department rows and the line shows a green check under Is Allocated, with the template name in Allocation Template.
The weights are 10 for Administration, 25 for Customer Support, 35 for Sales and 30 for Operations. A row's share is its weight divided by the total of the weights on that line, so 10 of 100 is 10 percent of 8,400.00, or 840.00. On a relative-weight worksheet like this one the weights do not have to add up to 100: weights of 1, 4 and 5 would give 10, 40 and 50 percent of the line. A template set up in percentages can have its own rule that they total 100, so follow any validation message the worksheet shows. Weights must be positive, and a rounding residual goes to the last row. The edit icon on a row opens it for changes without altering the template, and Add Line adds another row.
03. Split the contract labor line by subsidiary
Select the 6650 Contract Labor line. It has no template, so add its rows by hand. Click Add Line, type a weight of 60, choose the location West Distribution Center and the subsidiary Example Supply Co. : West, and confirm the row with the check icon. Add a second row with a weight of 40, the location East Warehouse and the subsidiary Example Supply Co. : East.
Of the 12,500.00 line, 60 percent, or 7,500.00, goes to West and 40 percent, or 5,000.00, stays in East. Choosing a subsidiary other than the bill's is what makes the allocation intercompany; the app creates the intercompany lines for you. Both allocated lines now carry a green check, and the 3,300.00 advertising line does not.
04. Save the worksheet
Click Save. The app shows a Saving Transaction message, stores the allocation and returns you to the bill. In the example the journal exists as soon as the bill reloads. If your account creates it on approval or on a schedule, the Shared Transaction subtab can stay empty until that trigger runs, and a journal that needs approval can exist without being posted.
05. Read the allocation impact on the bill
Open the bill's new Shared Transaction subtab. Allocation Impact lists the journal lines with their date, period, account, memo, debit and credit, department, class, location, subsidiary and allocation source line. For each allocated line the original expense is credited in East under the memo SHARED TRANSACTION REVERSAL, together with an intercompany receivable row. The first allocated line has no cross-subsidiary share, so its receivable row shows 0.00. A zero-amount row is how the app lays out the journal for a department-only line; you do not enter it, and you should check that your generated journal still posts.
After the reversals come the posted amounts: 840.00, 2,100.00, 2,940.00 and 2,520.00 to the four departments, then 7,500.00 of contract labor expense in West with a matching 7,500.00 intercompany payable credit, and 5,000.00 of contract labor expense in East. The 7,500.00 debited to the intercompany receivable in East is the amount West now owes it.
06. Open the generated journal
Each line's date links to the journal. Click one to open it. In the example it is Advanced Intercompany Journal 6214, dated with the bill and posting to the same period, and its Lines subtab lists the same eleven lines with their subsidiary, name, department, class and location. The caption above the lines shows the total, 28,400.00.
The journal's total debits and its total credits each come to 28,400.00. That is larger than the 20,900.00 you allocated because the journal reverses the 20,900.00 of original expense, reposts it to the destinations and adds a 7,500.00 intercompany receivable and payable pair. It is not 28,400.00 of cost. The bill is not rewritten, so its own GL Impact normally still shows the full expense in East and the journal does the reclassification. Check the bill and the journal separately.
07. Check the weights on the Allocations view
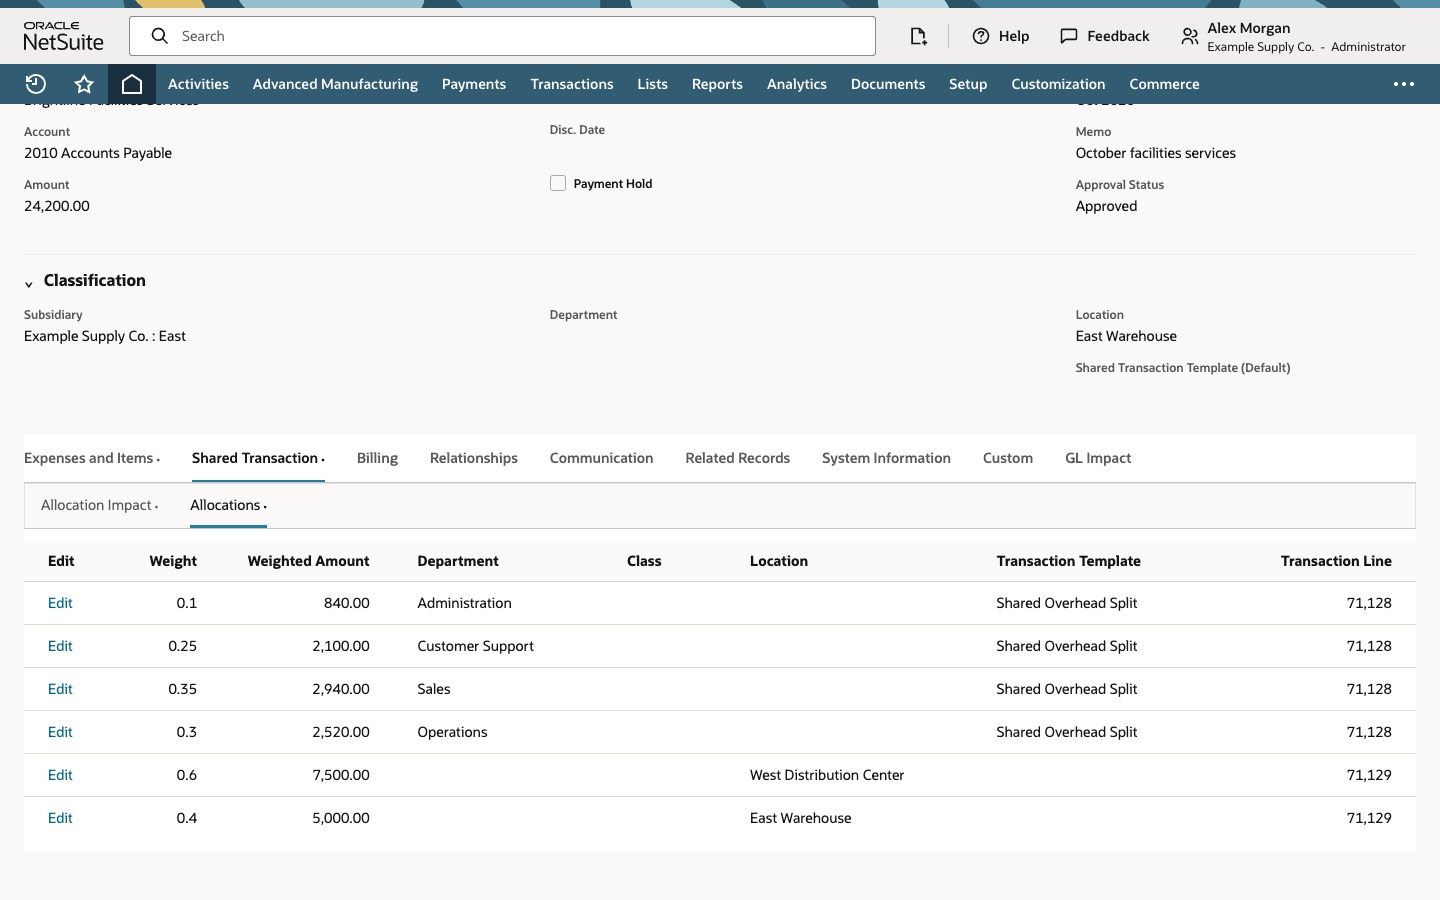
Go back to the bill, open Shared Transaction and choose Allocations. Each row shows its weight as a share of its line, 0.1, 0.25, 0.35 and 0.3 for the departments and 0.6 and 0.4 for the locations, with the weighted amount that was posted, the template and the transaction line. The Transaction Template column names Shared Overhead Split on the four department rows and is blank on the two subsidiary rows, which were entered by hand.
The allocation is complete when the bill's Shared Transaction subtab lists the generated lines, the linked journal balances, and the weighted amounts on the Allocations view add back to each allocated line: 8,400.00 and 12,500.00 here. Also open the journal's GL Impact and check its approval status, because a generated journal is not necessarily posted.
Common questions
Is Shared Transactions a native NetSuite feature?
No. It is a commercial SuiteApp. Allocate Expenses, the Shared Transaction Worksheet, Allocation Impact and the Shared Transaction subtab exist only where it is installed, licensed and enabled for the bill form and your role. Without it, the native options are an intercompany allocation schedule run after the bill posts, or a manual advanced intercompany journal.
Do allocation weights have to add up to 100?
Not on a relative-weight worksheet. A row's share is its weight divided by the total of the weights on that line, so weights of 60 and 40 and weights of 6 and 4 give the same split, and the Allocations view shows the share as a fraction, such as 0.6. A template or setting that works in percentages can require a total of 100, so follow the validation message the worksheet shows. Weights must be positive and the total cannot be zero.
Does the vendor bill's own GL Impact change?
Normally no. The bill usually stays posted as entered, with the full expense and payable in its own subsidiary, and the generated journal reclassifies the allocated amounts. This depends on the app's configuration and the type of transaction it generates, so read the bill's GL Impact and the journal's GL Impact separately and confirm the journal posted.
Why is the journal total larger than the amount I allocated?
The journal carries a reversal of each allocated expense line as well as the destination lines. In the example its total debits and total credits are each 28,400.00 against 20,900.00 of allocated expense: 20,900.00 of reversal and reposting plus a 7,500.00 intercompany receivable and payable pair. It is not 28,400.00 of cost.
What happens if I change an allocation after the journal exists?
It depends on the app's version, the bill's status and its configuration. The app may block the change, update the existing distribution, or reverse the journal and create a replacement. Do not edit or delete the linked journal by hand until you know which it does. In a sandbox, note the original journal number, then re-save an allocated bill, change its approval status, delete allocation rows, edit the bill and try a closed period. Check that the old journal is reversed, that the new one does not duplicate it, and whether the replacement needs its own approval.