The quick answer
Open the item, go to Purchasing/Inventory, and click Configure (or Edit) on the location's row in Locations. On the Inventory Count subtab, enter an Inventory Count Interval and a Next Inventory Count Date that falls inside your count window, then save. Run Create Inventory Count again with the same subsidiary, location and dates. The item should now be listed.
Create Inventory Count builds its list from each item's schedule at the location you pick. An item with no Next Inventory Count Date at that location has nothing for the date window to match, so it never appears. The example below uses fictional company, person and item data. It shows one subsidiary, one location and a week-long window.
Before you start
You need access to Create Inventory Count and to the item's location configuration, including the subsidiary, location, item and variance account involved. The Inventory Count feature must be enabled under Setup > Company > Enable Features on the Items & Inventory subtab.
Where the schedule fields live depends on your account. With Advanced Item Location Configuration, location settings open in a separate Item Location Configuration window, as in this example. Without it, the same fields may appear as columns directly on the item's Locations list, and the link label can differ by account, role and form.
This example uses the MM/DD/YYYY date format. Match your account's format when you type dates. It covers the standard calculated Inventory Count, not a manual count, a WMS cycle-count plan or a Smart Count task.
Saving the schedule changes the item's configuration at one location only. It does not create an inventory count, change on-hand quantity or start a count.
01. Check the count list first
Open Transactions > Inventory > Create Inventory Count. Choose the subsidiary and location, then enter a Count Start Date and a Count End Date. In the example these are Juniper Ridge US, Riverside Warehouse, 11/02/2026 and 11/08/2026. Leave Classification blank and both bin options unchecked.
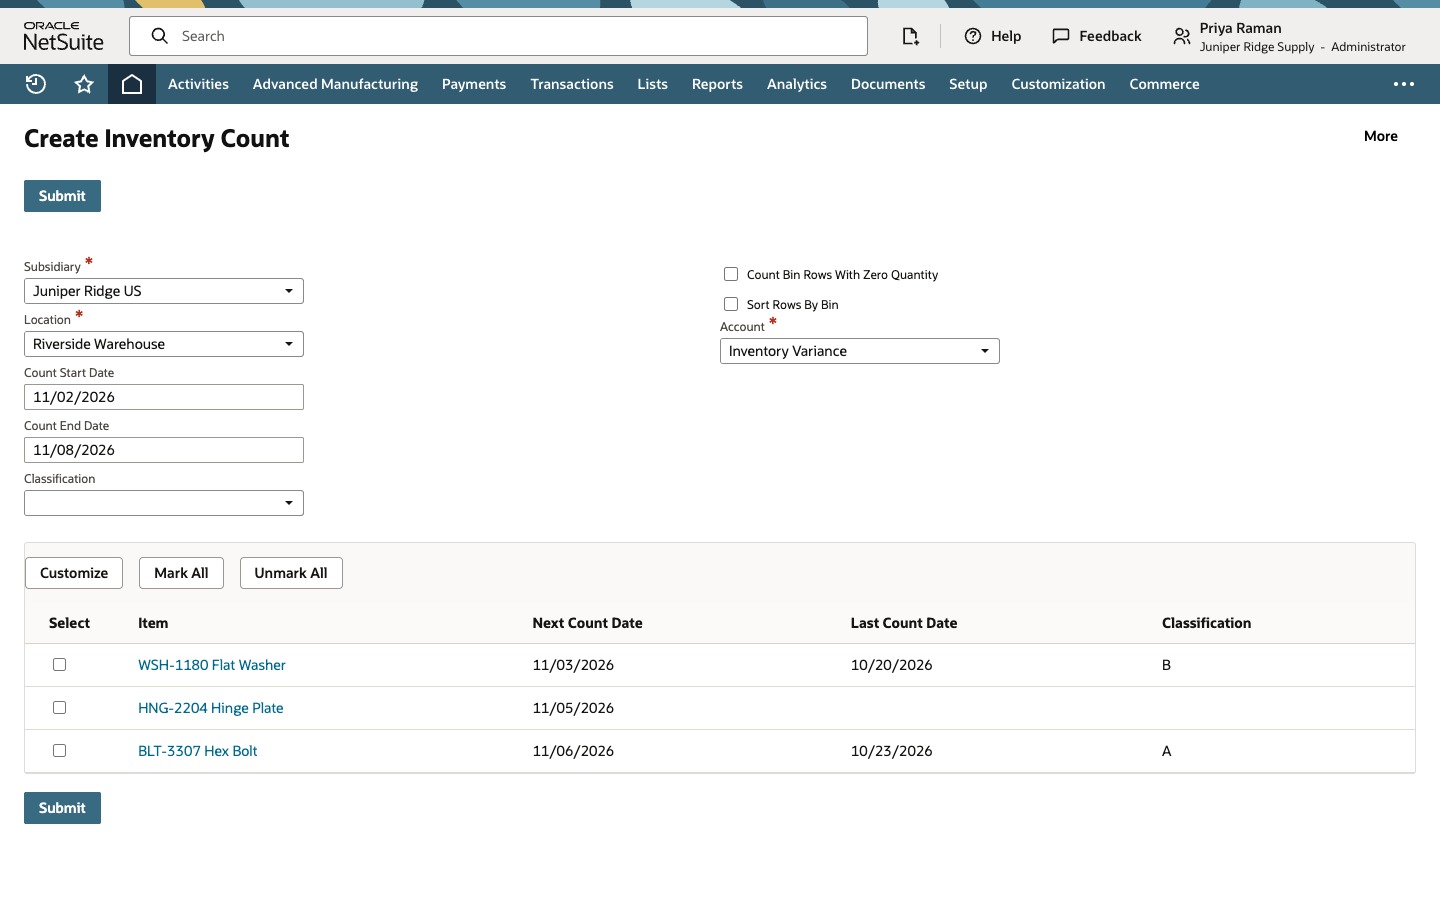
An item is a candidate when its Next Inventory Count Date at that location falls between the start and end dates, inclusive, and it also passes the other list criteria. Two items are listed here, WSH-1180 Flat Washer on 11/03/2026 and BLT-3307 Hex Bolt on 11/06/2026. HNG-2204 Hinge Plate is stocked at Riverside Warehouse but is missing. Having stock on hand is not enough to appear on the list.
02. Open the item's location configuration
Open the item record, go to the Purchasing/Inventory subtab and find the location on the Locations list. The Riverside Warehouse row shows 36 on hand. In this example its action link reads Configure, and it reads Edit after the configuration is saved. Click the link to open Item Location Configuration.
On the Inventory Count subtab, check the two schedule fields. In the example, Inventory Count Interval and Next Inventory Count Date are both blank. That is why the date window in this example cannot list the item. Last Inventory Count Date and Last Inventory Count Reason are display-only on this form and stay blank for an item that has not been counted.
03. Enter the schedule and save
Enter 14 as the Inventory Count Interval. That is the number of days between counts. Enter 11/05/2026 as the Next Inventory Count Date, a date inside the 11/02/2026 to 11/08/2026 window. The date is what places the item in this window. The interval alone does not. Click Save.
Back on the item, the Riverside Warehouse link now reads Edit. The change applies to Riverside Warehouse only. Other locations of the same item keep their own schedules. Saving changes the schedule fields only and creates no count.
04. Run the same list again
Open Create Inventory Count and enter the same subsidiary, location and dates. HNG-2204 Hinge Plate now appears with Next Count Date 11/05/2026, between WSH-1180 and BLT-3307. Its Last Count Date and Classification stay blank because it has not been counted or classified.
The list only offers candidates. Leave the Select boxes unchecked and do not click Submit unless you want to create a count. No inventory count exists after this walkthrough.
To confirm the result, check that HNG-2204 is listed, that its Next Count Date matches what you saved and that no row is selected.
Common questions
Why doesn't my item show up in Create Inventory Count?
Start with the item's Next Inventory Count Date at the location you selected. For the calculated count date filter, a blank date gives the item no scheduled date, so the window cannot select it. The item can still be counted through a manual count or another process. Then check that the date falls between Count Start Date and Count End Date, and that the subsidiary, location and Classification filters match the item.
What is the difference between Configure and Edit on the Locations list?
In this example, Configure appears before the location has a saved configuration and Edit appears afterward. Both open the same form. The label and the form itself depend on your account setup, role and version, and without Advanced Item Location Configuration the fields can appear directly on the Locations list.
Do I need to enter a Last Inventory Count Date?
No. A prior Last Inventory Count Date is not needed to set a next count date or to make an item eligible for the calculated list. HNG-2204 appears with a blank Last Count Date here. The count process maintains that field.
Does saving the next count date create an inventory count?
No. Saving changes the schedule fields only. On Create Inventory Count, displaying or selecting a row does not create a count either. Clicking Submit with rows selected creates one. It starts as an open count, and you start it later.
What happens to the next count date after a count is approved?
For the standard process, an approved count can update the item-location count history and set the next count date from the interval. The exact result depends on the item and location setup and the count type, and bin-managed or lot and serial items may need every applicable bin or detail counted first. Check the item-location record after your first approved count.